Great changes to the Silhouette software!
I bought a Silhouette digital craft cutter in November 2008 and have really had a lot of fun with it. Of course, Quickutz just came out with an updated version, but the great news is the new software can be used by my existing machine. Wow was I excited when I upgraded the software and started using the meld function. Here is my first LO where I created a whole new design, a scalloped frame, by starting with just a piece of an existing digital image (Quickutz Damask_8052). I used just the top most flourish of the Damask image, deleting all the other pieces of the design.
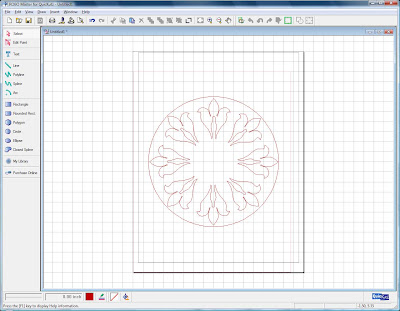
 Here is my single flourish from the Damask image. I have drawn a 6.5" circle on my screen and positioned the center of the circle on the intersection of a horizontal and vertical grid line. I then re sized the flourish to 2" high and put in on a vertical grid line with the tip of the flourish touching the circle.

I then copied and pasted the original flourish and positioned it on either horizontal or vertical grid lines.
Each time I added a flourish I made sure the tip of the flourish was touching the outer circle, this ensured that my design would be a perfect circle shape.

After I had placed the first four flourish images, I then continued to copy and paste 4 more shapes. This time I had no grid lines to help with placement, but the first four shapes could be used for evaluating spacing.
With the placement of these flourishes you still have the outer circle to guide the placement of the tip of the flourish.
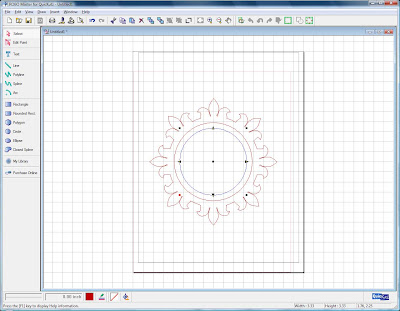
With all the flourishes in place its time to create our welded image. Select the circle and now re size it smaller. You'll want to make the circle small enough to allow the 3 leaf like shapes to extend outside the circle. Once your circle is re sized, select all the shapes at once (all flourishes and the circle). If you have selected correctly, all of the shapes should appear blue.
 Click the "weld" button, it will be the second to the last button on the right. All of the inner lines should disappear and you will have the outside share of your frame. It it doesn't look right you can always undo the weld action and reposition your circle for a better shape.
We still need some inner circles to finish the frame. Make sure you don't move the shape because we need to line up our inner circles on the grid.

I added two additional circles to my frame because I wanted a circle inside the fancy edge to set against my picture. I made sue that each new circle I added had the center of the circle placed on the same intersection of the grid that my original circle used. This allowed me to have a perfect center for placement. I then selected all the pieces of the image, both circles and the outer frame and "grouped" them together. Once grouped I could move the image around or re size it and retain the proportioned shape.


1 comments:
This is such a lovely LO my friend! I like the way the LO keeps looking organized, even with all the shapes you have included. And your colour choice, like always, is fab!
xxx Peggy
Post a Comment